2.3.1 Welcome screen - Select your Preferred Installation Language
The Installer automatically detects your regional settings and on start initiates the graphical user interface with the best installation language that fits to your needs.
Nevertheless, you could change the installation language manually using a drop-down list with the options:
✓Bulgarian
✓English
✓French
✓German
✓Italian
✓Hungarian
2.3.2 Welcome screen - Ready to Install BINETIX® PTM™
This screen confirms that you can continue with the deployment process using the selected installation language.
There are three main navigation buttons positioned bottom-right on the screen that can be used to switch between the installation steps, or to cancel the installation at any time.
2.3.3 Customer information
At this stage it is important to populate the following three fields:
•User Name: usually contains the Windows' user who is currently logged-in;
•Organization: please, type the name of the enterprise entity that holds the product license;
•Serial Number: please, enter the exact character sequence of the serial number provided with the current installation.
Note: Please be advised that incorrect information populated in above fields may lead to deployment interruption or failure!
2.3.4 Choose Setup Type
Here you may have a choice between three main installation types:
a)Typical - An automatic features selection with the most common (predefined) installation options. This is the common recommended type.
b)Custom - Allows users to choose witch program features will be installed, and where they will be placed. This installation option, described in details below, is recommended for advanced users only.
c)Complete - All program features will be installed. This is an automatic approach to deploy all features of the product but it will require most disk space.
Additionally, here you can specify the product installation path.
The default installation path of BINETIX® PTM™ is: C:\Program Files\BINETIX\PTM\20xx
2.3.5 Custom Installation with Feature Selection
This step is required in case the Custom installation type is selected.
The product deployment is organized as follows:
❑System's Core (mandatory) - This is the functional core of BINETIX® PTM™.
❑Web Application (optional, selected) - These features provide different resources and modules for the main Web-site of BINETIX® PTM™.
❑Resources (mandatory, selected) - This is a must-have feature automatically selected and mandatory for any WebApp deployments.
❑Modules (optional) - This is a group of features as follows:
❑Module "Web Portal"
❑Module "Registries and Nomenclatures"
❑Module "Documentary Operations"
❑Module "SWIFT Operations"
❑Module "Accounting Operations"
❑Module "Reports"
❑Module "MoneyGram Payments"
❑Module "ATM Payments"
❑Configurations (mandatory, selected) - This is a must-have feature automatically selected and mandatory for any WebApp deployments.
❑External Interfaces (optional, selected) - This feature installs the "External Interfaces" functional module - this fully documented API allows external systems to commence variety tasks and functions of the PTM platform.
❑Maintenance (optional, selected) - This feature installs a system tool for executing and scheduling communication and maintenance tasks.
❑System Utilities (optional) - This feature installs set of data management tools. A recommended option for the DB administrators.
❑Configuration (optional) - This feature provides some predefined configuration and database samples.
Notes:
At this stage, for your convenience, you can still update the product installation path as explained in the previous deployment step.
2.3.6 Setup the system settings
BINETIX® PTM™ Installer is designed to automate great many things for the overall deployment. However, the following three fields must be verified and populated carefully:
1)Connection String to the MSSQL Server:
The Connection string must be fully compliant and preliminary tests against a real MSSQL server. The following two samples can be used as templates:
✓For Integrated Security:
Data Source=10.0.0.1;Initial Catalog=PTMDocOper;Integrated Security=True
✓For Persisted User-Password based Security:
Data Source=10.0.0.1;Initial Catalog=PTMDocOper;Persist Security Info=True;User ID=sa;Password=1234567
2)Local Country Code (ISO 3166) - Defaults to BGR
3)Local Currency Code (ISO 4217) - Defaults to BGN
2.3.7 Configure Shortcuts
In case you're deploying BINETIX® PTM™ on Windows system with GUI you have an option to request the Installer to create some shortcuts for better quick access and better management.
Here you have two options:
1)To create a shortcut on your Desktop to the Web Application
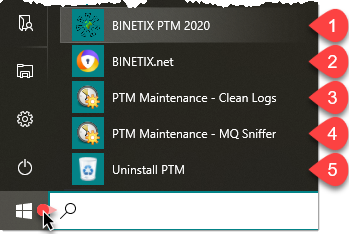
2)To create a shortcut group into your Start Menu Programs Folder. Please refer to "Check-out the Deployment" section for more details.
2.3.8 Ready to Install
This preliminary step is intended to inform you that you are ready to deploy BINETIX® PTM™.
At this stage you can:
a)Proceed - press "Install" button.
b)Review or change any of the installation settings - press "Back" button.
c)Exit from the installation wizard - press "Cancel" button.
2.3.9 Installation in progress
By pressing the "Install" button BINETIX® PTM™ Installer will perform the entire deployment process by reporting the progress status on the screen.
You will be informed right away in case of exceptions with notifications and options to retry, cancel or ignore any issues detected during the installation process.
2.3.10 Completing the Deployment Sequence
This is the last step for the current deployment.
At this stage BINETIX® PTM™ should be deployed and fully functional.
Click the "Finish" button to exit the BINETIX® PTM™ Installer program, and check-out the deployment results.
|
 Deployment Sequence for Installation